Tuesday, 25 August 2015

Automate Thrift Server Start/Stop in Hortonworks Hbase using shell script

1. Create a .sh file

2.      sudo kill -9 `sudo netstat -nlp|grep 9090 | awk '{print $7}' | cut -c1-5`
         hbase thrift start -threadpool

3. Copy the above lines.

4. Execute the shell script. -> /home/brillio/xxxxxxx.sh

5. Done.

Saturday, 22 August 2015

Connect Hbase in Hortonworks and Tableau

Step 1 : Start the rest server in Hortonworks Linux machine

             /usr/hdp/2.2.6.0-2800/hbase/bin/hbase-daemon.sh start rest -p 9768

Note: 9768 is port I have selected. make sure this port is free in your machine or else use a different port.

Step 2 : Download Simba ODBC Driver (in Windows Machine, where your tableau server is)

             http://www.simba.com/connectors/apache-hbase-odbc

Step 3 : Install it.

Step 4 :

Go to path highlighted in Yellow -> Add your Public Virtual IP ( you can get it from Azure VM -  Dashboard) . Enter port as used in command in step 1.

Step 5 : If you are using Azure , make sure in endpoints you have opened 9768 port.

Step 6 : Test the connection, it should show list of tables.

Step 7 : Connect with tableau using Other ODBC Connection. Select Simba as DNS and provide Server.

Step 8 : If it doesn't work, make sure you have copied Simba licence file, which you received in email to the installed location. (C:\Program Files\Simba HBase ODBC Driver\lib)

Friday, 21 August 2015

Connect to Hbase using Python Code and happybase

Step 1 : pip install happybase

Step 2 :

import happybase

#Pass public virtual IP, you can find it in Azure VM dashboard
connection = happybase.Connection('137.135.XX.XXX')

#Snippet to create table

#connection.create_table(
#mytablefrompythoncode',
#{'cf1': dict(max_versions=10),
#'cf2': dict(max_versions=1, block_cache_enabled=False),
#'cf3': dict(), # use defaults
#}
#)

#Print available tables
print connection.tables()
#Creating an instance
table = connection.table('mytablefrompythoncode')

Step 3 : hbase thrift start -threadpool (in Hortonworks Linux Machine)

Step 4 : To invoke this .py code from Linux, just copy the .py script to Linux local using WinScp or any tool and in command line type:
cd /Path_where_code_is
python xxxxxxxx.py

Thursday, 20 August 2015

Connecting Hortonworks Hive and Tableau

Connecton between Tableau and Hive


Download This for your platform :

Hive ODBC Driver for HDP 2.2 (v1.4.14)
The Hortonworks Hive ODBC Driver allows you to connect popular Business    Intelligence (BI) tools to query, analyze and visualize data stored within the Hortonworks    Data Platform.


Use this for settings:


username : hive
password : xxxxxxxxxx

You can find the above info from : your_ambari_server.cloudapp.net:8080


Friday, 7 August 2015

HDFS Commands


hadoop fs -ls          

hadoop fs -ls /

hadoop fs -mkdir test     (Make directory)

hadoop fs -mkdir -p test/test2/test3    (Create directories at one go )

hadoop fs -rm -R test/test2        (Remove)

cd /root/devph/labs/Lab2.1/
tail data.txt

hadoop fs -put data.txt test/

hadoop fs -cp test/data.txt test/test1/data2.txt

hadoop fs -rm test/test1/data2.txt

hadoop fs -cat test/data.txt

hadoop fs -tail test/data.txt

hadoop fs -get test/data.txt /tmp/

hadoop fs -put /root/devph/labs/demos/small_blocks.txt test/

hadoop fs -getmerge test /tmp/merged.txt        (Merge all files under this dir and put them to local)

hadoop fs -D dfs.blocksize=1048576 -put data.txt data.txt   (Fix block size and dump)

hdfs fsck /user/root/data.txt    (File system check-- No of blocks check)

Wednesday, 5 August 2015

Pseudo Node Setup

Create VM in Microsoft Azure.
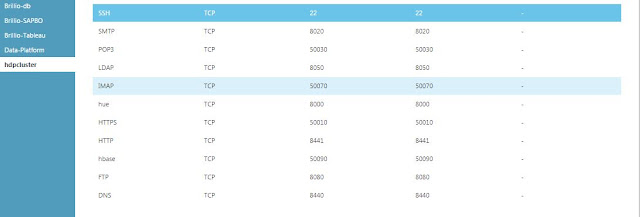
Open ports:


sudo vi /etc/sysctl.conf
      fs.file-max = 65536

sudo vi /etc/security/limits.conf
                *          soft     nproc          65535
*          hard     nproc          65535
*          soft     nofile         65535
*          hard     nofile         65535

sudo vi /etc/security/limits.d/90-nproc.conf
*          soft     nproc          65535
*          hard     nproc          65535
*          soft     nofile         65535
*          hard     nofile         65535

sudo reboot

ssh-keygen

sudo chmod 700 ~/.ssh

chmod 600 ~/.ssh/authorized_keys

sudo yum install ntp

sudo chkconfig ntpd on

sudo hostname xxxxxxxxxxxx.cloudapp.net

hostname -f

sudo vi /etc/hosts
     100.73.40.57 xxxxxxxxxxxx.cloudapp.net

sudo vi /etc/sysconfig/network
     NETWORKING_IPV6=yes

sudo chkconfig iptables off

sudo /etc/init.d/iptables stop

setenforce 0

sudo vi /etc/selinux/config
     SELINUX=disabled

sudo vi /etc/profile

wget http://public-repo-1.hortonworks.com/ambari/centos6/2.x/updates/2.0.1/ambari.repo

sudo cp ambari.repo /etc/yum.repos.d/

sudo yum install ambari-server

sudo ambari-server setup

sudo ambari-server start

sudo ambari-server status

sudo chkconfig iptables off

sudo /etc/init.d/iptables stop

Access to Ambari web: http://ambari.server.host:8080/
Follow the wizards to create your cluster.
They will ask for the list of nodes that you want to setup, use their FQDN to enter.

Create keys for your Linux Machine

Step 1: Install a Linux machine.
Step 2: Type openssl   --> if this is not working then in command line, enter -   
            sudo yum install openssl
Step 3: Next we will generate myCert.pem and myPrivateKey.key : 
            openssl req -x509 -nodes -days 365 -newkey rsa:2048 -keyout myPrivateKey.key -out myCert.pem
Step 4: keep hitting enter, as it prompts for question.
Step 5: Now, type pwd , in command line and check the path. 
Step 6: Go to that path and you should have myCert.pem and myPrivateKey.key

Step 7: Now change the permissions of myPrivateKey.key(important)
            chmod 600 myPrivateKey.key
Step 8: Now, let us create the corresponding myCert.cer
            openssl  x509 -outform der -in /home/brillio/myCert.pem -out /home/brillio/myCert.cer
Step 9: Now we will create a ppk for putty. For this we first need to create RSA Private Key that PuttyGen(tool to create ppk) can understand.
            openssl rsa -in /home/brillio/myPrivateKey.key -out myPrivateKey_rsa
            chmod 600 /home/brillio/myPrivateKey_rsa
Step10: Now, download PuttyGen (This will generate ppk files for us to connect using putty)
Step 11: Now load the myPrivateKey_rsa and save the corresponding private and public keys.

Step 12: Now you should have the following keys.
Step 13: Next step is to download putty.exe.
Step 14: Open putty and provide hostname or IP Address as shown
Step 15: Click on Auth as shown, and provide the .ppk file just created. Click on open and you should be able to login to Linux machine using Putty.

Tuesday, 4 August 2015

Java Code to Kill Process in Linux (VM in Azure cloud)

Step 1 : It uses JSch jar file. Make sure you have downloaded it.
http://www.java2s.com/Code/JarDownload/jsch/jsch-0.1.42.jar.zip
Step 2 : Generate Private key for your linux machine in case you don't have. You can follow this link, for the same .
http://mydailyfindingsit.blogspot.in/2015/08/create-keys-for-your-linux-machine.html
Step 3 : Copy the code below, modify the lines highlighted in yellow.
Step 4 : Create the main() method to call the below function.


public boolean killPythonProcess(){

        int count = 5;
     
        JSch jsch = new JSch();
        String prvkey = "E:\\myPrivateKey_rsa";
        String host = "bdp-hdp.cloudapp.net";
        String user = "lokesh";
        String command = "kill -9 `ps -ef | grep python | grep root | awk '{print $2}'`";
        try{
        jsch.addIdentity(prvkey);
        Session session = jsch.getSession(user, host, 22);
        session.setConfig("StrictHostKeyChecking", "no");
        session.connect();
        com.jcraft.jsch.Channel channel = session.openChannel("exec");
        ((ChannelExec) channel).setCommand(command);
        channel.setInputStream(null);
        channel.setOutputStream(System.out);
        ((ChannelExec) channel).setErrStream(System.err);
        InputStream in = channel.getInputStream();
        InputStream error = channel.getExtInputStream();
        channel.connect();
        byte[] tmp = new byte[1024];
        while (count >= 0) {
        while(error.available() > 0){
                     int i = error.read(tmp, 0, 1024);
                     if (i < 0)
                      break;
                     System.out.print(new String(tmp, 0, i));
               }
               while (in.available() > 0) {
                     int i = in.read(tmp, 0, 1024);
                     if (i < 0)
                            break;
                     System.out.print(new String(tmp, 0, i));
                }
               if (channel.isClosed()) {
                    System.out.println("exit-status: " + channel.getExitStatus());
                     break;
               }
               Thread.sleep(1000);
               count--;
        }
         channel.disconnect();
         session.disconnect();

        }
         catch(JSchException | InterruptedException |IOException j){
        return false;
           }

return true;
}


Step 5 : Bingo ! Done.

HP-R205TU External Harddisk Not recognized

Well if the external hard-disk is working fine in other laptops and "red" light blinks when you insert your USB, then might you want to give this a try..

Step 1: Go to Device Manager and Click on USB Root Hub ( Highlighted)
Step 2: Right click and go to properties.
Step 3: Click on the Power Management tab , make sure the first option is unchecked.
Step 4 : Repeat step 2 and 3 for all USB related Hub in Universal Serial Bus controller (Device Manager)
Step 5 : Insert your External hard-disk, it should read now !

Oracle Virtual Machine Does Not Start on Windows 10

The workaround which i found is :

Uninstall the previous virtual box and download the version 4.3.12


http://download.virtualbox.org/virtualbox/4.3.12/VirtualBox-4.3.12-93733-Win.exe

Install it, and it should work fine. 

Make sure you have saved all your previous work !
Cheers!